

図: (左)起動時および [幅を 100 にする] ボタン押下時、 (右) [幅を 200 にする] ボタン押下時
WPF と Blend を使うことで、かっこいいアニメーションを伴うプログラムを比較的楽に実現することができるようになりました。
本ページでは、WPFを使ってアニメーションを実現する方法の基本的な手法について記載してみます。
"DoubleAnimation" というクラスを使って特定のプロパティをアニメーションする方法を説明します。
ここでは画面上のボタンをクリックすると Rectangle の幅を1秒の時間をかけてアニメーションすることを例に記載します。
- 2つのボタンと1つのRetangleを画面上に置きます。
-
プログラム起動時、Rectangleの幅を100とします。
- ボタン[幅を 200
にする]をクリックすると、Rectangleの幅を1秒間のアニメーションで200にします。
- ボタン[幅を 100
にする]をクリックすると、Rectangleの幅を1秒間のアニメーションで100にします。
-
アニメーションに使用するイージング関数としてここでは"PowerEase"を使用します。


図: (左)起動時および
[幅を 100 にする] ボタン押下時、 (右) [幅を 200 にする] ボタン押下時
動画: Rectangle の幅を 100 と 200 に変更するアニメーション処理
| コンパイラ : | Visual Studio 2017 pro., | Version 16.6.0 |
| フレームワーク : | .NET Framework | 4.6.1 |
| OS : | Windows10 home | |
手順1:
・新規プロジェクトを作成後、2つのボタンと1つのRectangleを画面上に配置します。
・ボタンとRectangleに名前を付けて、位置と大きさを整えます。
手順2:
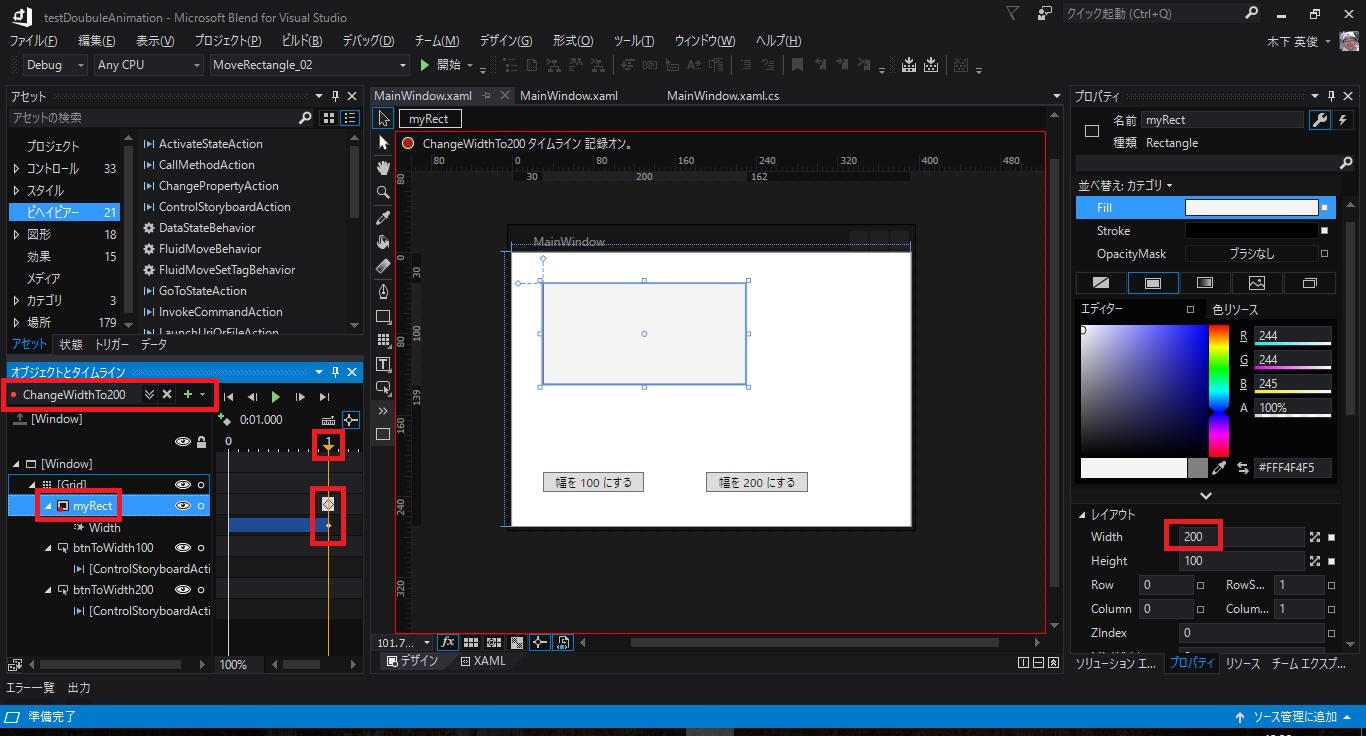
・Blend を使って下記2つのストーリーボードを作成します。
今回の内容の場合は 1秒後の状態 のみを定めればよいです。0秒時点の状態は未定義にします。
(1) Rectangle の幅を 100
にするストーリーボード (x:Key="ChangeToWidth100")
(2) Rectangle の幅を 200
にするストーリーボード (x:Key="ChangeToWidth200")
手順3:
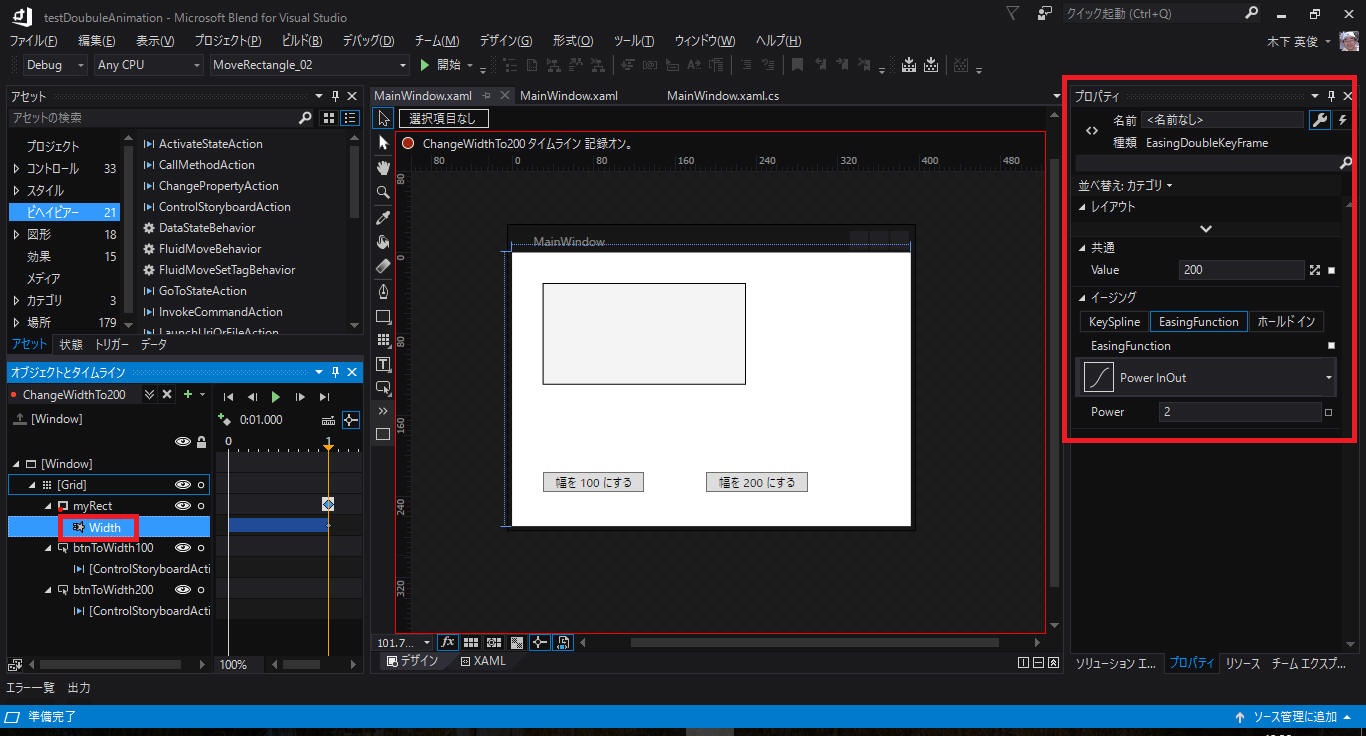
・作成した2つのストーリーボードについて、適用するイージング関数を設定します。
下記例では EasingFunction として「Power InOut」を設定しています。
手順4:
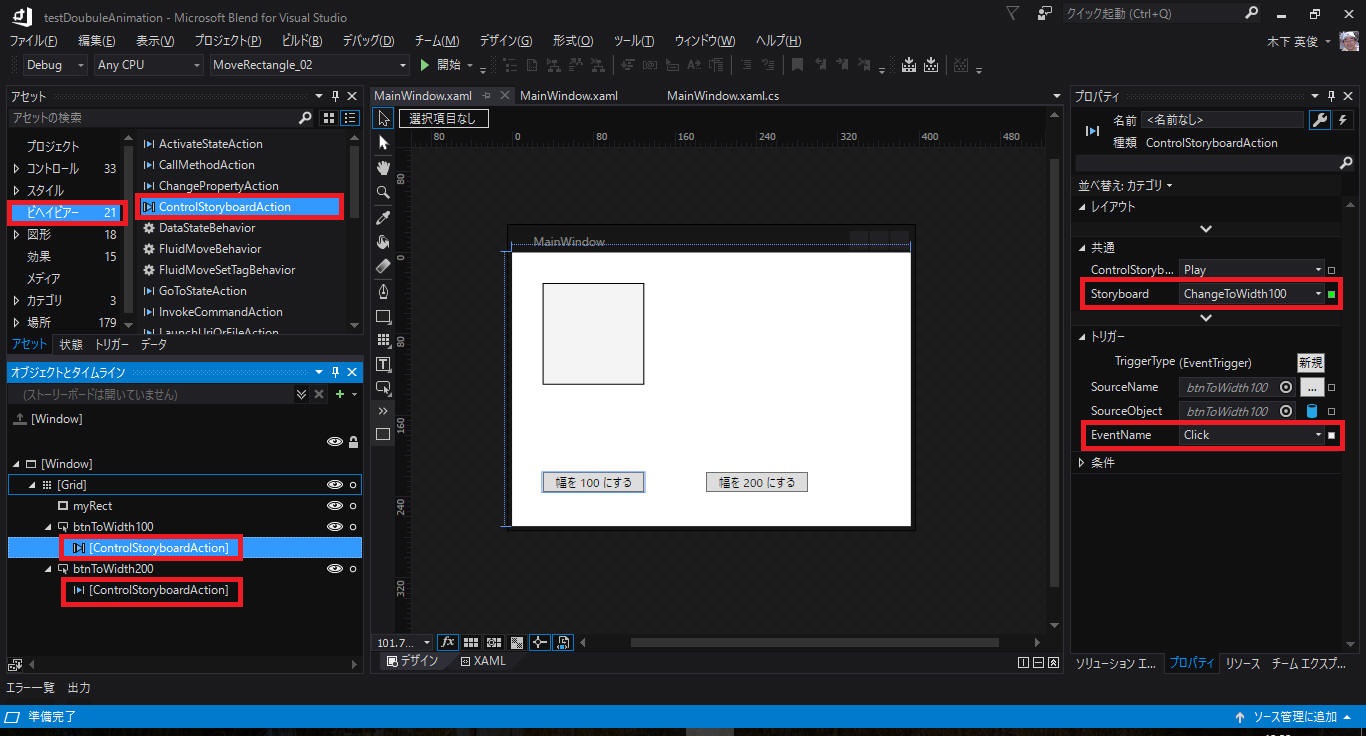
・2つのボタンにビヘイビアーから "ControlStoryboardAction" をドラッグで設定します。
・各
"ControlStoryboardAction" のプロパティ設定にて以下を設定します。
(1) EventName: ”Click”
を選択します。
(2) Storyboard: ボタンクリック時に期待する動作となるストーリーボードを選択します。
これで完成です。コードビハインドによる実装はありません。
以上の手順で作成したXAMLを以下に示します。
<Window
        xmlns="http://schemas.microsoft.com/winfx/2006/xaml/presentation"
        xmlns:x="http://schemas.microsoft.com/winfx/2006/xaml"
        xmlns:d="http://schemas.microsoft.com/expression/blend/2008"
        xmlns:mc="http://schemas.openxmlformats.org/markup-compatibility/2006"
        xmlns:local="clr-namespace:MoveRectangle_02"
        xmlns:i="http://schemas.microsoft.com/expression/2010/interactivity"
        xmlns:ei="http://schemas.microsoft.com/expression/2010/interactions"
        x:Class="MoveRectangle_02.MainWindow"
        mc:Ignorable="d"
        Title="MainWindow" Height="300" Width="400">
    <Window.Resources>
        <Storyboard x:Key="ChangeToWidth100">
            <DoubleAnimationUsingKeyFrames Storyboard.TargetProperty="(FrameworkElement.Width)" Storyboard.TargetName="myRect">
                <EasingDoubleKeyFrame KeyTime="0:0:1" Value="100">
                    <EasingDoubleKeyFrame.EasingFunction>
                        <PowerEase EasingMode="EaseInOut"/>
                    </EasingDoubleKeyFrame.EasingFunction>
                </EasingDoubleKeyFrame>
            </DoubleAnimationUsingKeyFrames>
        </Storyboard>
        <Storyboard x:Key="ChangeWidthTo200">
            <DoubleAnimationUsingKeyFrames Storyboard.TargetProperty="(FrameworkElement.Width)" Storyboard.TargetName="myRect">
                <EasingDoubleKeyFrame KeyTime="0:0:1" Value="200">
                    <EasingDoubleKeyFrame.EasingFunction>
                        <PowerEase EasingMode="EaseInOut"/>
                    </EasingDoubleKeyFrame.EasingFunction>
                </EasingDoubleKeyFrame>
            </DoubleAnimationUsingKeyFrames>
        </Storyboard>
    </Window.Resources>
    <Grid>
        <Rectangle x:Name="myRect" Width="100" Height="100"  Fill="#FFF4F4F5" HorizontalAlignment="Left"
            Margin="30,30,0,0" Stroke="Black" VerticalAlignment="Top" d:LayoutOverrides="VerticalAlignment"/>

        <Button x:Name="btnToWidth100" Content="幅を 100 にする" Width="100" Height="20"
            HorizontalAlignment="Left" VerticalAlignment="Top" Margin="30,215.828,0,0" d:LayoutOverrides="HorizontalAlignment">
            <i:Interaction.Triggers>
                <i:EventTrigger EventName="Click">
                    <ei:ControlStoryboardAction Storyboard="{StaticResource ChangeToWidth100}"/>
                </i:EventTrigger>
            </i:Interaction.Triggers>
        </Button>

        <Button x:Name="btnToWidth200" Content="幅を 200 にする" Width="100" Height="20"
            Margin="190.662,215.828,0,0" VerticalAlignment="Top" d:LayoutOverrides="Width" HorizontalAlignment="Left">
            <i:Interaction.Triggers>
                <i:EventTrigger EventName="Click">
                    <ei:ControlStoryboardAction Storyboard="{StaticResource ChangeWidthTo200}"/>
                </i:EventTrigger>
            </i:Interaction.Triggers>
        </Button>

    </Grid>
</Window>
VS2019 から "Blend SDK for Visual Studio" が無くなりました。このため前述の「1-1.
VS2017版」に記載のプログラムは VS2019 では動作しなくなりました。
代わりに(?) OSS の
Micorosoft.Xaml.Behaviors.Wpf が Github に登録されています。今後はこちらを使え、ってことなんでしょうね。
というわけで、Microsoft.Xaml.Behaviors.Wpf を使って前述プログラムを作り直します。
| コンパイラ : | Microsoft Visual Studio Community 2019, | Version 16.11.20 |
| フレームワーク : | .NET Framework, | 4.6.1 |
| ライブラリ : | Microsoft.Xaml.Behaviors.Wpf, | Version 1.1.39 |
| OS : | Windows 11 Home, | 22H2 |
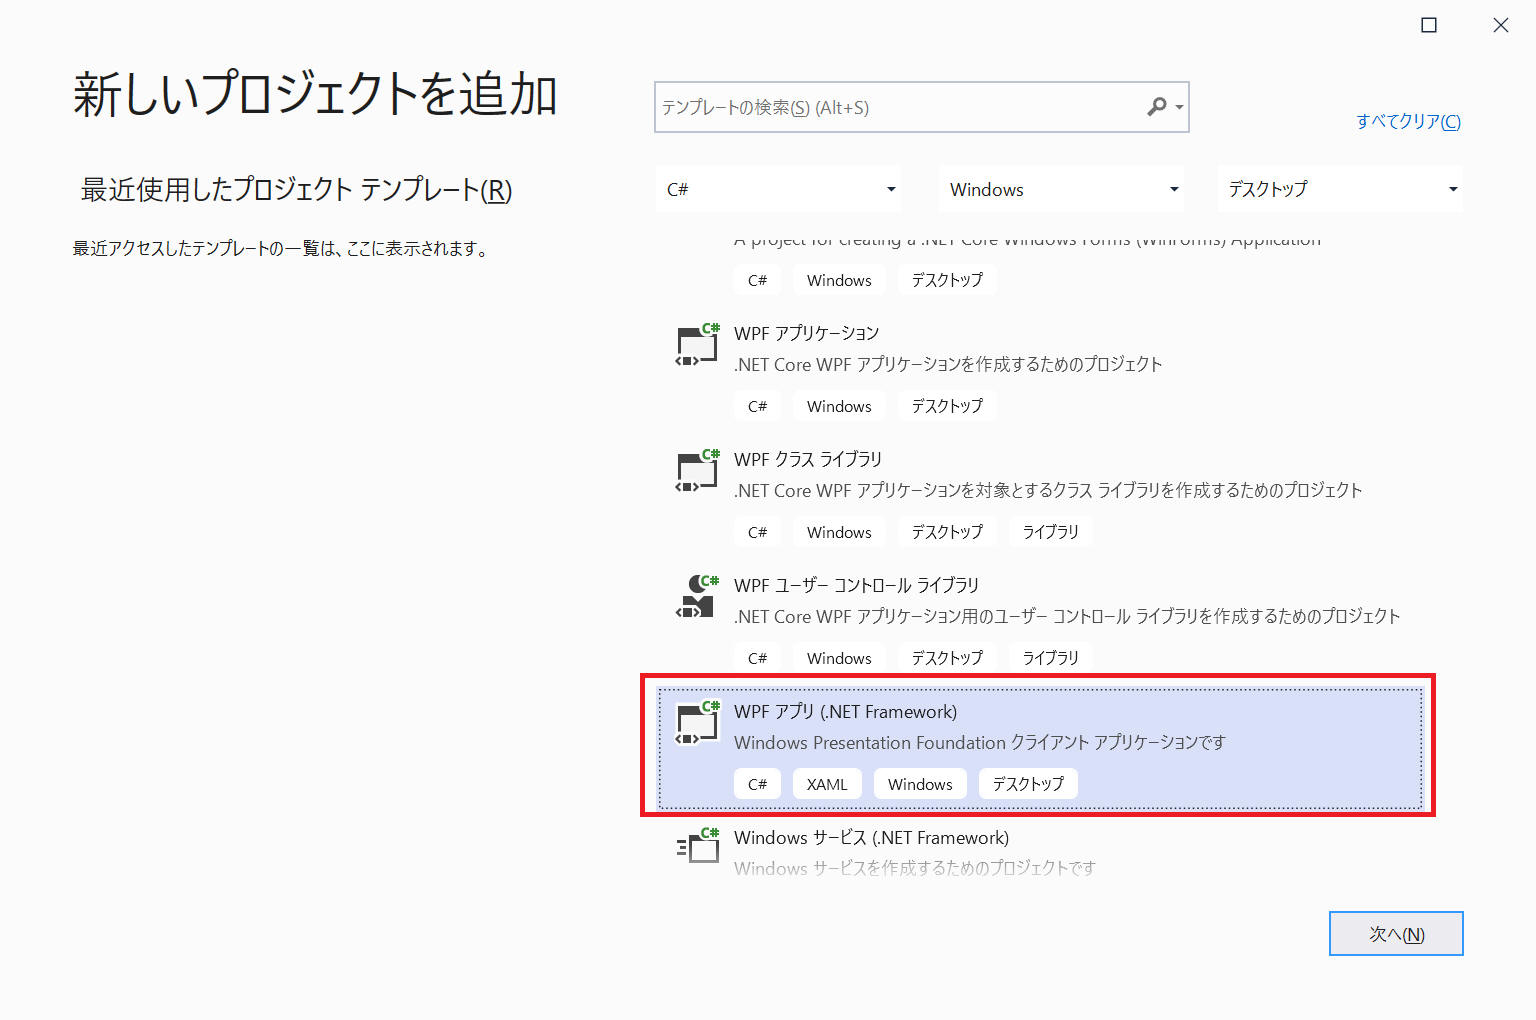
Step1:
新しいプロジェクトを「WPF アプリ(.NET Framework)」で新規作成します。
Step2:
NuGet から ”Microsoft.Xaml.Behaviors.Wpf” をプロジェクトへ設定します。

Step3:
2つのボタンと1つの Rectangle を配置し、位置と大きさを適当に調整します。
ボタンには下図のようなラベルを書いてみます。

Step4:
Blend を使って下記2つのストーリーボードを作成します。
今回の内容の場合は 1秒後の状態 のみを定めればよいです。0秒時点の状態は未定義にします。
(1) Rectangle の幅を 100
にするストーリーボード (x:Key="ChangeToWidth100")
(2) Rectangle の幅を 200
にするストーリーボード (x:Key="ChangeToWidth200")
作成した2つのストーリーボードについて、適用するイージング関数を設定します。下記例では EasingFunction として「Power InOut」を設定しています。

Step5:
・2つのボタンにビヘイビアーから "ControlStoryboardAction" をドラッグで設定します。
・各 "ControlStoryboardAction" のプロパティ設定にて以下を設定します。
(1) EventName: ”Click” を選択します。
(2) Storyboard: ボタンクリック時に期待する動作となるストーリーボードを選択します。
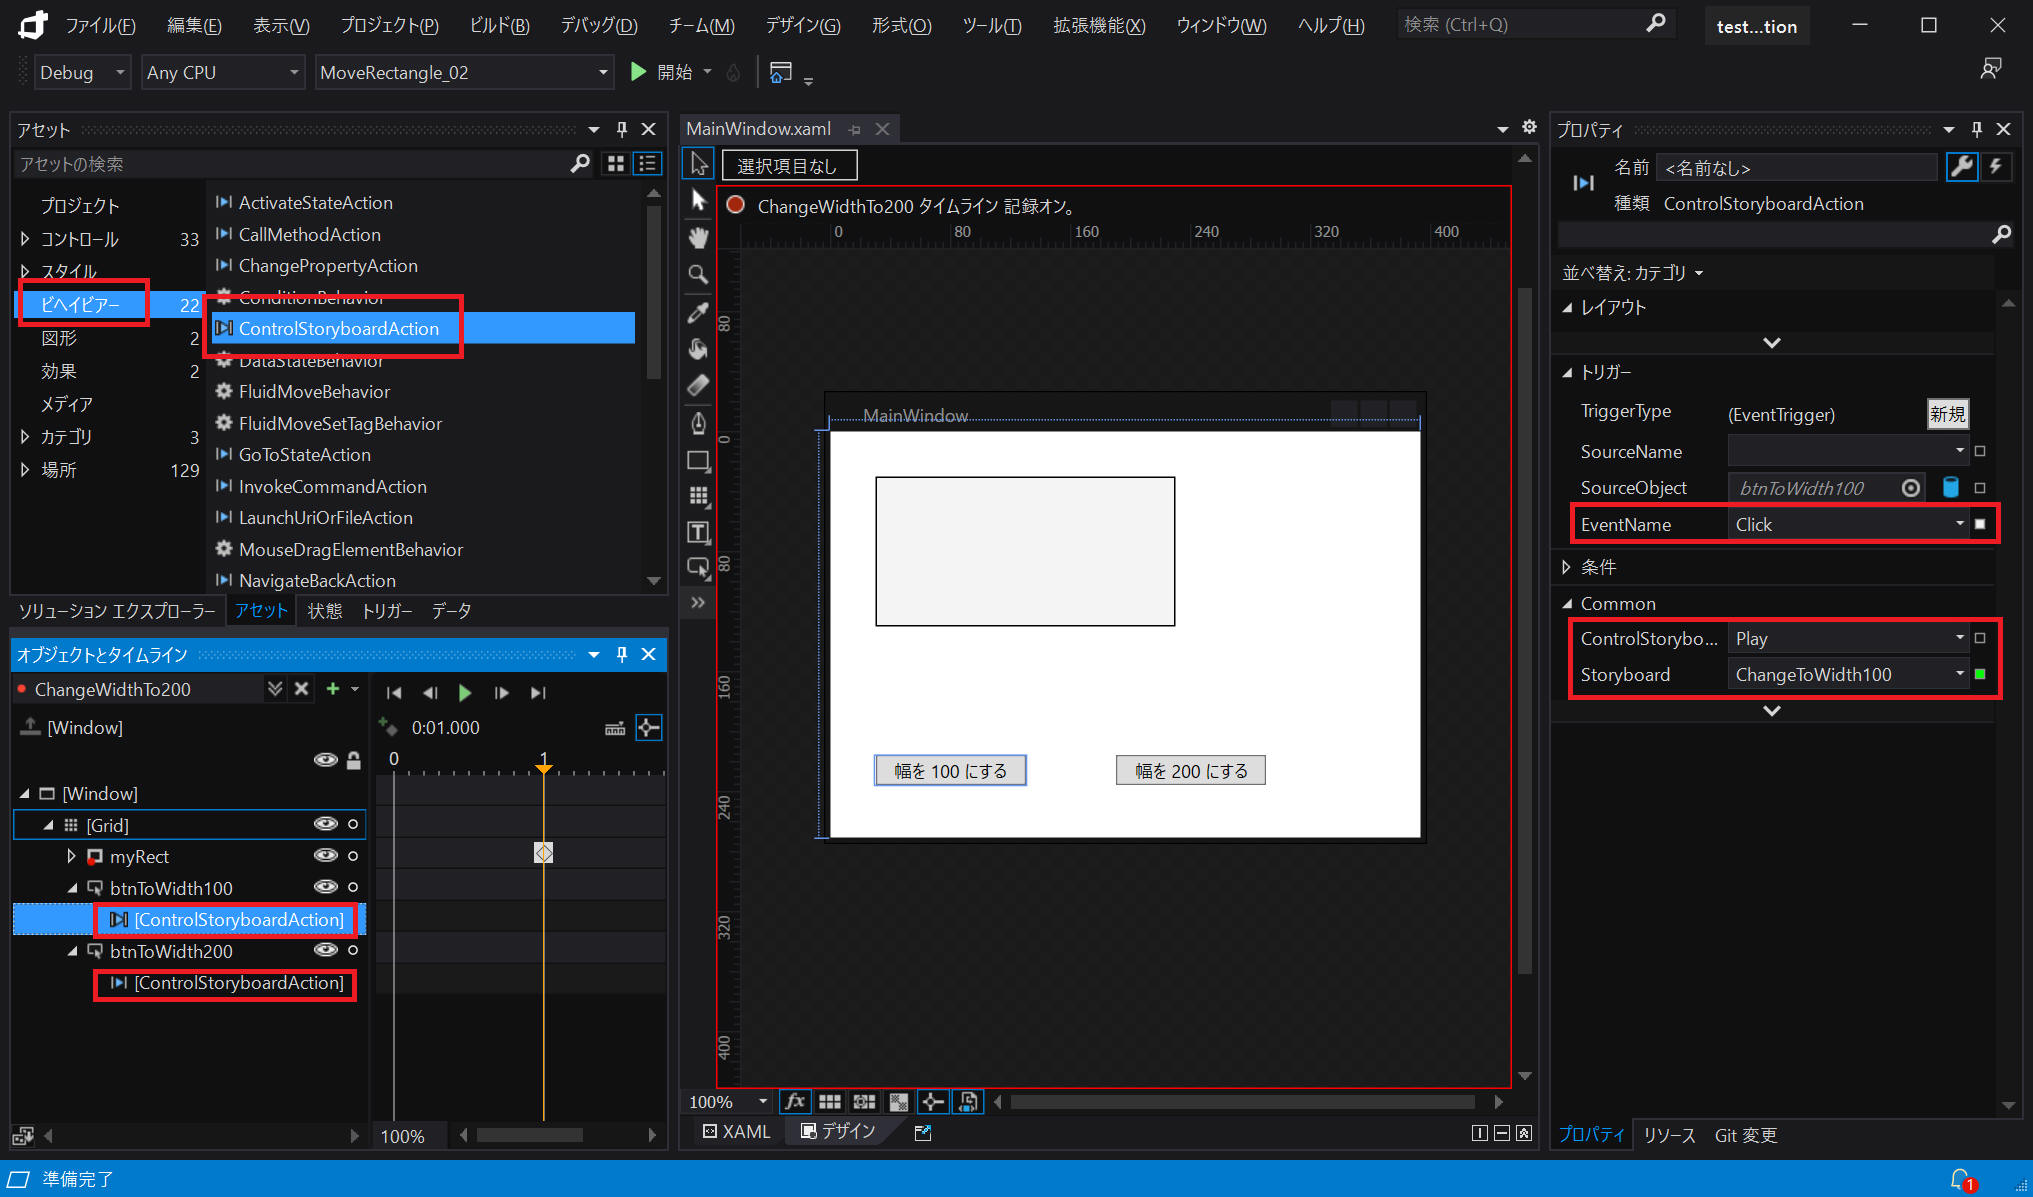
これで完成です。コードビハインドによる実装はありません。以上の手順で作成したXAMLを以下に示します。
namespace の設定部分 xmlns:i="http://schemas.microsoft.com/xaml/behaviors" を忘れないようにしましょう。
["MainWindow.xaml"]
<Window
        xmlns="http://schemas.microsoft.com/winfx/2006/xaml/presentation"
        xmlns:x="http://schemas.microsoft.com/winfx/2006/xaml"
        xmlns:d="http://schemas.microsoft.com/expression/blend/2008"
        xmlns:mc="http://schemas.openxmlformats.org/markup-compatibility/2006"
        xmlns:local="clr-namespace:MoveRectangle_02"
        xmlns:i="http://schemas.microsoft.com/xaml/behaviors"
        x:Class="MoveRectangle_02.MainWindow"
        mc:Ignorable="d"
        Title="MainWindow" Height="300" Width="400">
    <Window.Resources>
        <Storyboard x:Key="ChangeToWidth100">
            <DoubleAnimationUsingKeyFrames Storyboard.TargetProperty="(FrameworkElement.Width)" Storyboard.TargetName="myRect">
                <EasingDoubleKeyFrame KeyTime="0:0:1" Value="100">
                    <EasingDoubleKeyFrame.EasingFunction>
                        <PowerEase EasingMode="EaseInOut"/>
                    </EasingDoubleKeyFrame.EasingFunction>
                </EasingDoubleKeyFrame>
            </DoubleAnimationUsingKeyFrames>
        </Storyboard>
        <Storyboard x:Key="ChangeWidthTo200">
            <DoubleAnimationUsingKeyFrames Storyboard.TargetProperty="(FrameworkElement.Width)" Storyboard.TargetName="myRect">
                <EasingDoubleKeyFrame KeyTime="0:0:1" Value="200">
                    <EasingDoubleKeyFrame.EasingFunction>
                        <PowerEase EasingMode="EaseInOut"/>
                    </EasingDoubleKeyFrame.EasingFunction>
                </EasingDoubleKeyFrame>
            </DoubleAnimationUsingKeyFrames>
        </Storyboard>
    </Window.Resources>
    <Grid>
        <Rectangle x:Name="myRect" Fill="#FFF4F4F5" HorizontalAlignment="Left" Height="100" Margin="30,30,0,0" Stroke="Black" VerticalAlignment="Top" Width="100" d:LayoutOverrides="VerticalAlignment"/>
        <Button x:Name="btnToWidth100" Content="幅を 100 にする" HorizontalAlignment="Left" Margin="30,215.828,0,0" VerticalAlignment="Top" Width="100" d:LayoutOverrides="HorizontalAlignment" Height="20">
            <i:Interaction.Triggers>
                <i:EventTrigger EventName="Click">
                    <i:ControlStoryboardAction Storyboard="{StaticResource ChangeToWidth100}"/>
                </i:EventTrigger>
            </i:Interaction.Triggers>
        </Button>
        <Button x:Name="btnToWidth200" Content="幅を 200 にする" Margin="190.662,215.828,0,0" VerticalAlignment="Top" Width="100" Height="20" d:LayoutOverrides="Width" HorizontalAlignment="Left">
            <i:Interaction.Triggers>
                <i:EventTrigger EventName="Click">
                    <i:ControlStoryboardAction Storyboard="{StaticResource ChangeWidthTo200}"/>
                </i:EventTrigger>
            </i:Interaction.Triggers>
        </Button>
    </Grid>
</Window>
念のためコードビハインド側も参考記載します。プロジェクト作成直後と同じ状態です。
["MainWindow.xaml.cs"]
using System.Windows;

namespace MoveRectangle_02
{
    /// <summary>
    /// MainWindow.xaml の相互作用ロジック
    /// </summary>
    public partial class MainWindow : Window
    {
        public MainWindow()
        {
            InitializeComponent();
        }
    }
}
以上です。
「1. Rectangle の幅(Width)をアニメーションする - XAML版」 で作成したXAML版と同じ内容を、今度は コードビハインド(code-behind)による実装で実現してみます。
プロパティの変化先を動的に変化させたい場合はコードビハインドで作成する必要を生じるため、このテクニックを必要とします。
逆にXAMLで作成できる場合は詳細なプロパティ設定を Blend で行える場面が多いため、楽に確実に実装することができるように感じます。
| コンパイラ : | Microsoft Visual Studio Community 2019, | Version 16.11.20 |
| Microsoft Visual Studio Pro. 2017, | ||
| フレームワーク : | .NET Framework, | 4.6.1 |
| OS : | Windows 11 Home, | 22H2 |
| Windows 10 Home, | ||
手順1: XAML定義
アニメーションはコードビハインドで作成しますが、基本的な画面まではXAMLで作成します。
以下に記載します。
<Window x:Class="MoveRectangle_03.MainWindow"
        xmlns="http://schemas.microsoft.com/winfx/2006/xaml/presentation"
        xmlns:x="http://schemas.microsoft.com/winfx/2006/xaml"
        xmlns:d="http://schemas.microsoft.com/expression/blend/2008"
        xmlns:mc="http://schemas.openxmlformats.org/markup-compatibility/2006"
        xmlns:local="clr-namespace:MoveRectangle_03"
        mc:Ignorable="d"
        Title="MainWindow" Height="300" Width="400">
    <Grid>
        <Rectangle x:Name="myRect" Fill="#FFF4F4F5" HorizontalAlignment="Left" Height="100" Margin="30,30,0,0"
            Stroke="Black" VerticalAlignment="Top" Width="100" d:LayoutOverrides="VerticalAlignment"/>

        <Button x:Name="btnToWidth100" Content="幅を 100 にする" HorizontalAlignment="Left" Margin="30,215.828,0,0"
            VerticalAlignment="Top" Width="100" d:LayoutOverrides="HorizontalAlignment" Height="20"/>

        <Button x:Name="btnToWidth200" Content="幅を 200 にする" Margin="190.662,215.828,0,0" VerticalAlignment="Top"
            Width="100" Height="20" d:LayoutOverrides="Width" HorizontalAlignment="Left"/>
    </Grid>
</Window>
手順2: ボタンクリック時のイベントアクションを定義
下記2つのボタンをクリックしたときのアクションを定義します。
- btnToWidth100
- btnToWidth200
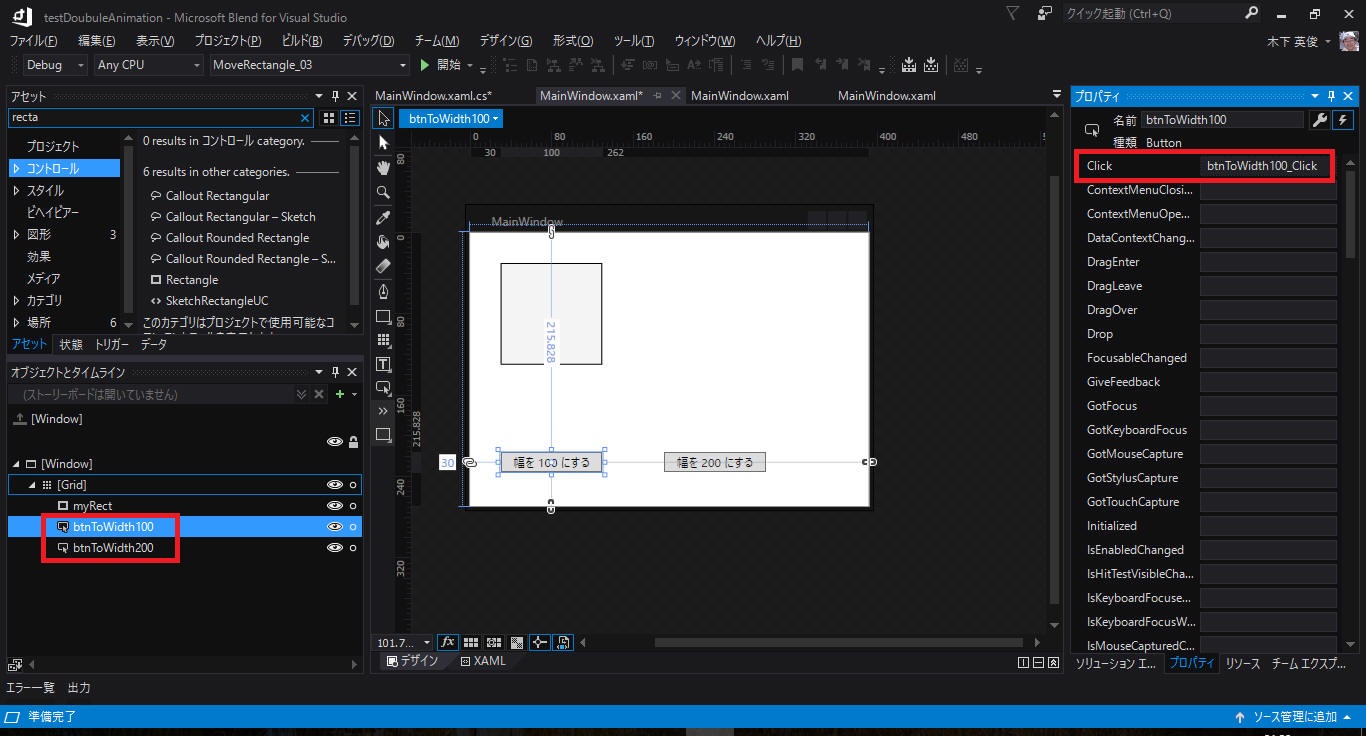
この状態でのコードの状況を以下に示します。
["MainWindow.xaml.cs"]
using System;
using System.Collections.Generic;
using System.Linq;
using System.Text;
using System.Threading.Tasks;
using System.Windows;
using System.Windows.Controls;
using System.Windows.Data;
using System.Windows.Documents;
using System.Windows.Input;
using System.Windows.Media;
using System.Windows.Media.Imaging;
using System.Windows.Navigation;
using System.Windows.Shapes;

namespace MoveRectangle_03
{
    /// <summary>
    /// MainWindow.xaml の相互作用ロジック
    /// </summary>
    public partial class MainWindow : Window
    {
        public MainWindow()
        {
            InitializeComponent();
        }

        private void btnToWidth100_Click(object sender, RoutedEventArgs e)
        {
        }

        private void btnToWidth200_Click(object sender, RoutedEventArgs e)
        {
        }
    }
}
このときの XAML は以下の通りです。
["MainWindow.xaml"]
<Window x:Class="MoveRectangle_03.MainWindow"
        xmlns="http://schemas.microsoft.com/winfx/2006/xaml/presentation"
        xmlns:x="http://schemas.microsoft.com/winfx/2006/xaml"
        xmlns:d="http://schemas.microsoft.com/expression/blend/2008"
        xmlns:mc="http://schemas.openxmlformats.org/markup-compatibility/2006"
        xmlns:local="clr-namespace:MoveRectangle_03"
        mc:Ignorable="d"
        Title="MainWindow" Height="300" Width="400">
    <Grid>
        <Rectangle x:Name="myRect" Fill="#FFF4F4F5" HorizontalAlignment="Left" Height="100" Margin="30,30,0,0"
            Stroke="Black" VerticalAlignment="Top" Width="100" d:LayoutOverrides="VerticalAlignment"/>

        <Button x:Name="btnToWidth100" Content="幅を 100 にする" HorizontalAlignment="Left" Margin="30,215.828,0,0"
            VerticalAlignment="Top" Width="100" d:LayoutOverrides="HorizontalAlignment" Height="20" Click="btnToWidth100_Click"/>

        <Button x:Name="btnToWidth200" Content="幅を 200 にする" Margin="190.662,215.828,0,0" VerticalAlignment="Top"
            Width="100" Height="20" d:LayoutOverrides="Width" HorizontalAlignment="Left" Click="btnToWidth200_Click"/>

    </Grid>
</Window>
手順3: アニメーション処理を実装
コードビハインドによりアニメーション処理を実装します。以下に記載します。
using System;
using System.Collections.Generic;
using System.Linq;
using System.Text;
using System.Threading.Tasks;
using System.Windows;
using System.Windows.Controls;
using System.Windows.Data;
using System.Windows.Documents;
using System.Windows.Input;
using System.Windows.Media;
using System.Windows.Media.Imaging;
using System.Windows.Navigation;
using System.Windows.Shapes;

using System.Windows.Media.Animation;


namespace MoveRectangle_03
{
    /// <summary>
    /// MainWindow.xaml の相互作用ロジック
    /// </summary>
    public partial class MainWindow : Window
    {
        public MainWindow()
        {
            InitializeComponent();
        }

        private void btnToWidth100_Click(object sender, RoutedEventArgs e)
        {
            var storyBoard = new Storyboard();

            var widthAnimation = new DoubleAnimation
            {
                From = myRect.Width,
                To = 100,
                Duration = TimeSpan.FromSeconds(1.0),
                EasingFunction = new PowerEase
                {
                    EasingMode = EasingMode.EaseInOut
                }
            };
            Storyboard.SetTargetProperty(widthAnimation, new PropertyPath("Width"));

            storyBoard.Children.Add(widthAnimation);

            myRect.BeginStoryboard(storyBoard);
        }

        private void btnToWidth200_Click(object sender, RoutedEventArgs e)
        {
            var storyBoard = new Storyboard();

            var widthAnimation = new DoubleAnimation
            {
                From = myRect.Width,
                To = 200,
                Duration = TimeSpan.FromSeconds(1.0),
                EasingFunction = new PowerEase
                {
                    EasingMode = EasingMode.EaseInOut
                }
            };
            Storyboard.SetTargetProperty(widthAnimation, new PropertyPath("Width"));

            storyBoard.Children.Add(widthAnimation);

            myRect.BeginStoryboard(storyBoard);
        }
    }
}
"DoubleAnimation" というクラスを使って特定のプロパティをアニメーションする方法を説明します。
ここでは画面上のボタンをクリックすると Rectangle の幅と高さを1秒の時間をかけてアニメーションすることを例に記載します。
前章までの内容との違いは、複数のプロパティを同時にアニメーションする、という部分です。
本章ではボタンイベントを「ビヘイビア」ではなく「トリガー」を使って実現します。
| コンパイラ : | Microsoft Visual Studio Community 2019, | Version 16.11.20 |
| Microsoft Visual Studio Pro. 2017, | ||
| フレームワーク : | .NET Framework, | 4.6.1 |
| OS : | Windows 11 Home, | 22H2 |
| Windows 10 Home, | ||
- 2つのボタンと1つのRetangleを画面上に置きます。
-
プログラム起動時、Rectangleの幅と高さを100にします。
- ボタン[幅と高さを 200
にする]をクリックすると、Rectangleの幅と高さを1秒間のアニメーションで200にします。
- ボタン[幅と高さを 100
にする]をクリックすると、Rectangleの幅と高さを1秒間のアニメーションで100にします。
-
アニメーションに使用するイージング関数としてここでは"PowerEase"を使用します。
[完成イメージ]
動作イメージを以下に示します。
手順1:
・新規プロジェクトを作成後、2つのボタンと1つのRectangleを画面上に配置します。
・ボタンとRectangleに名前を付けて、位置と大きさを整えます。
手順2:
ここでは Blend を使って編集してみます。
[トリガー]ウィンドウを表示して、2つのボタンに対してそれぞれ "Click" イベントを追加します。

手順3:
続いて Blend を使って「ストーリーボード」を追加します。
「オブジェクトとタイムライン」ウィンドウを表示して、2つのストーリーボードを追加します。ここでは下記2つのストーリーボードを作成します。
(1) "ChangeTo100": Rectangle の幅・高さを 100 にするストーリーボード
(2) "ChangeTo200":
Rectangle の幅・高さを 200 にするストーリーボード
「オブジェクトとタイムライン」から「新規作成...」をクリックして新しいストーリーボードを追加します。

手順4:
ストーリーボード上でアニメーション内容を設定します。
ここでは1秒後に Rectangle の Width および Height を 200
にするアニメーションを作成しています。

手順5:
作成した2つのストーリーボードについて、適用するイージング関数を設定します。
Width, Height をそれぞれ設定しても良いですし、2つをまとめて設定することもできます。
まとめて設定する場合は、[Shift]を押しながらマウスでクリックすれば複数のプロパティを選択可能です。
下記例では EasingFunction として「Power InOut」を、Power(次数)として 2 を、それぞれ設定しています。

以上で完成です。わかってしまえばとても簡単です。
出来上がった XAML コードは以下の通りです。
1つの Storyboard に対して2つの
DoubleAnimationUsingKeyFrames が登録されていることがわかります。
<Window x:Class="MoveRectangle_04.MainWindow"
        xmlns="http://schemas.microsoft.com/winfx/2006/xaml/presentation"
        xmlns:x="http://schemas.microsoft.com/winfx/2006/xaml"
        xmlns:d="http://schemas.microsoft.com/expression/blend/2008"
        xmlns:mc="http://schemas.openxmlformats.org/markup-compatibility/2006"
        xmlns:local="clr-namespace:MoveRectangle_04"
        mc:Ignorable="d"
        Title="MainWindow" Height="300" Width="400">
    <Window.Resources>
        <Storyboard x:Key="ChangeTo100">
            <DoubleAnimationUsingKeyFrames Storyboard.TargetProperty="(FrameworkElement.Width)" Storyboard.TargetName="myRect">
                <EasingDoubleKeyFrame KeyTime="0:0:1" Value="100">
                    <EasingDoubleKeyFrame.EasingFunction>
                        <PowerEase EasingMode="EaseInOut"/>
                    </EasingDoubleKeyFrame.EasingFunction>
                </EasingDoubleKeyFrame>
            </DoubleAnimationUsingKeyFrames>
            <DoubleAnimationUsingKeyFrames Storyboard.TargetProperty="(FrameworkElement.Height)" Storyboard.TargetName="myRect">
                <EasingDoubleKeyFrame KeyTime="0:0:1" Value="100">
                    <EasingDoubleKeyFrame.EasingFunction>
                        <PowerEase EasingMode="EaseInOut"/>
                    </EasingDoubleKeyFrame.EasingFunction>
                </EasingDoubleKeyFrame>
            </DoubleAnimationUsingKeyFrames>
        </Storyboard>
        <Storyboard x:Key="ChangeTo200">
            <DoubleAnimationUsingKeyFrames Storyboard.TargetProperty="(FrameworkElement.Width)" Storyboard.TargetName="myRect">
                <EasingDoubleKeyFrame KeyTime="0:0:1" Value="200">
                    <EasingDoubleKeyFrame.EasingFunction>
                        <PowerEase EasingMode="EaseInOut"/>
                    </EasingDoubleKeyFrame.EasingFunction>
                </EasingDoubleKeyFrame>
            </DoubleAnimationUsingKeyFrames>
            <DoubleAnimationUsingKeyFrames Storyboard.TargetProperty="(FrameworkElement.Height)" Storyboard.TargetName="myRect">
                <EasingDoubleKeyFrame KeyTime="0:0:1" Value="200">
                    <EasingDoubleKeyFrame.EasingFunction>
                        <PowerEase EasingMode="EaseInOut"/>
                    </EasingDoubleKeyFrame.EasingFunction>
                </EasingDoubleKeyFrame>
            </DoubleAnimationUsingKeyFrames>
        </Storyboard>
    </Window.Resources>
    <Window.Triggers>
        <EventTrigger RoutedEvent="ButtonBase.Click" SourceName="btnToWidth100">
            <BeginStoryboard x:Name="ChangeTo100_BeginStoryboard" Storyboard="{StaticResource ChangeTo100}"/>
        </EventTrigger>
        <EventTrigger RoutedEvent="ButtonBase.Click" SourceName="btnToWidth200">
            <BeginStoryboard x:Name="ChangeTo200_BeginStoryboard" Storyboard="{StaticResource ChangeTo200}"/>
        </EventTrigger>
    </Window.Triggers>
    <Grid>
        <Rectangle x:Name="myRect" Fill="#FFF4F4F5" HorizontalAlignment="Left" Height="100" Margin="30,30,0,0"
            Stroke="Black" VerticalAlignment="Top" Width="100" d:LayoutOverrides="VerticalAlignment"/>
        <Button x:Name="btnToWidth100" Content="幅と高さを 100 にする" Margin="30,215.828,0,0"
            VerticalAlignment="Top" HorizontalAlignment="Left" Width="130" Height="20"/>
        <Button x:Name="btnToWidth200" Content="幅と高さを 200 にする" Margin="190.662,215.828,0,0"
            VerticalAlignment="Top" HorizontalAlignment="Left" Width="130" Height="20"/>
    </Grid>
</Window>
[概要]
「3. Rectangle の幅と高さをアニメーションする - XAML版」 で作成したXAML版と同じ内容を、今度は コードビハインド(code-behind)による実装で実現してみます。
プロパティの変化先を動的に変化させたい場合はコードビハインドで作成する必要を生じるため、このテクニックを必要とします。
逆にXAMLで作成できる場合は詳細なプロパティ設定を Blend で行える場面が多いため、楽に確実に実装することができるように感じます。
[環境]
[作成手順]
手順1: XAML定義
アニメーションはコードビハインドで作成しますが、基本的な画面まではXAMLで作成します。
以下に記載します。
<Window x:Class="MoveRectangle_03.MainWindow"
        xmlns="http://schemas.microsoft.com/winfx/2006/xaml/presentation"
        xmlns:x="http://schemas.microsoft.com/winfx/2006/xaml"
        xmlns:d="http://schemas.microsoft.com/expression/blend/2008"
        xmlns:mc="http://schemas.openxmlformats.org/markup-compatibility/2006"
        xmlns:local="clr-namespace:MoveRectangle_03"
        mc:Ignorable="d"
        Title="MainWindow" Height="300" Width="400">
    <Grid>
        <Rectangle x:Name="myRect" Fill="#FFF4F4F5" HorizontalAlignment="Left" Height="100" Margin="30,30,0,0"
            Stroke="Black" VerticalAlignment="Top" Width="100" d:LayoutOverrides="VerticalAlignment"/>

        <Button x:Name="btnToWidth100" Content="幅を 100 にする" HorizontalAlignment="Left" Margin="30,215.828,0,0"
            VerticalAlignment="Top" Width="100" d:LayoutOverrides="HorizontalAlignment" Height="20"/>

        <Button x:Name="btnToWidth200" Content="幅を 200 にする" Margin="190.662,215.828,0,0" VerticalAlignment="Top"
            Width="100" Height="20" d:LayoutOverrides="Width" HorizontalAlignment="Left"/>
    </Grid>
</Window>
手順2: ボタンクリック時のイベントアクションを定義
下記2つのボタンをクリックしたときのアクションを定義します。
- btnToWidth100
- btnToWidth200

この状態でのコードの状況を以下に示します。
["MainWindow.xaml.cs"]
using System;
using System.Collections.Generic;
using System.Linq;
using System.Text;
using System.Threading.Tasks;
using System.Windows;
using System.Windows.Controls;
using System.Windows.Data;
using System.Windows.Documents;
using System.Windows.Input;
using System.Windows.Media;
using System.Windows.Media.Imaging;
using System.Windows.Navigation;
using System.Windows.Shapes;

namespace MoveRectangle_03
{
    /// <summary>
    /// MainWindow.xaml の相互作用ロジック
    /// </summary>
    public partial class MainWindow : Window
    {
        public MainWindow()
        {
            InitializeComponent();
        }

        private void btnToWidth100_Click(object sender, RoutedEventArgs e)
        {
        }

        private void btnToWidth200_Click(object sender, RoutedEventArgs e)
        {
        }
    }
}
このときの XAML は以下の通りです。
["MainWindow.xaml"]
<Window x:Class="MoveRectangle_03.MainWindow"
        xmlns="http://schemas.microsoft.com/winfx/2006/xaml/presentation"
        xmlns:x="http://schemas.microsoft.com/winfx/2006/xaml"
        xmlns:d="http://schemas.microsoft.com/expression/blend/2008"
        xmlns:mc="http://schemas.openxmlformats.org/markup-compatibility/2006"
        xmlns:local="clr-namespace:MoveRectangle_03"
        mc:Ignorable="d"
        Title="MainWindow" Height="300" Width="400">
    <Grid>
        <Rectangle x:Name="myRect" Fill="#FFF4F4F5" HorizontalAlignment="Left" Height="100" Margin="30,30,0,0"
            Stroke="Black" VerticalAlignment="Top" Width="100" d:LayoutOverrides="VerticalAlignment"/>

        <Button x:Name="btnToWidth100" Content="幅を 100 にする" HorizontalAlignment="Left" Margin="30,215.828,0,0"
            VerticalAlignment="Top" Width="100" d:LayoutOverrides="HorizontalAlignment" Height="20" Click="btnToWidth100_Click"/>

        <Button x:Name="btnToWidth200" Content="幅を 200 にする" Margin="190.662,215.828,0,0" VerticalAlignment="Top"
            Width="100" Height="20" d:LayoutOverrides="Width" HorizontalAlignment="Left" Click="btnToWidth200_Click"/>

    </Grid>
</Window>
手順3: アニメーション処理を実装
コードビハインドによりアニメーション処理を実装します。以下に記載します。
Height 用のアニメーション指示を追加してStoryboardに追加する、というような実装になります。
using System;
using System.Windows;
using System.Windows.Media.Animation;   // Storyboard, DoubleAnimation, PowerEase, EasingMode

namespace MoveRectangle_05
{
    /// <summary>
    /// MainWindow.xaml の相互作用ロジック
    /// </summary>
    public partial class MainWindow : Window
    {
        public MainWindow()
        {
            InitializeComponent();
        }

        private void btnToWidth100_Click(object sender, RoutedEventArgs e)
        {
            System.Diagnostics.Trace.WriteLine("[btnToWidth100_Click]");

            var storyBoard = new Storyboard();

            var widthAnimation = new DoubleAnimation
            {
                From = myRect.Width,
                To = 100,
                Duration = TimeSpan.FromSeconds(1.0),
                EasingFunction = new PowerEase
                {
                    EasingMode = EasingMode.EaseInOut
                }
            };
            var heightAnimation = new DoubleAnimation
            {
                From = myRect.Height,
                To = 100,
                Duration = TimeSpan.FromSeconds(1.0),
                EasingFunction = new PowerEase
                {
                    EasingMode = EasingMode.EaseInOut
                }
            };

            Storyboard.SetTargetProperty(widthAnimation, new PropertyPath("Width"));
            Storyboard.SetTargetProperty(heightAnimation, new PropertyPath("Height"));

            storyBoard.Children.Add(widthAnimation);
            storyBoard.Children.Add(heightAnimation);

            myRect.BeginStoryboard(storyBoard);
        }

        private void btnToWidth200_Click(object sender, RoutedEventArgs e)
        {
            System.Diagnostics.Trace.WriteLine("[btnToWidth200_Click]");

            var storyBoard = new Storyboard();

            var widthAnimation = new DoubleAnimation
            {
                From = myRect.Width,
                To = 200,
                Duration = TimeSpan.FromSeconds(1.0),
                EasingFunction = new PowerEase
                {
                    EasingMode = EasingMode.EaseInOut
                }
            };
            var heightAnimation = new DoubleAnimation
            {
                From = myRect.Height,
                To = 200,
                Duration = TimeSpan.FromSeconds(1.0),
                EasingFunction = new PowerEase
                {
                    EasingMode = EasingMode.EaseInOut
                }
            };

            Storyboard.SetTargetProperty(widthAnimation, new PropertyPath("Width"));
            Storyboard.SetTargetProperty(heightAnimation, new PropertyPath("Height"));

            storyBoard.Children.Add(widthAnimation);
            storyBoard.Children.Add(heightAnimation);

            myRect.BeginStoryboard(storyBoard);
        }
    }
}
[概要]
「3. Rectangle の幅と高さをアニメーションする - XAML版」 で作成したXAML版と同じ内容を元に、イベントトリガーで実現していた部分だけをコードビハインドで実現します。コードビハインドでは、XAMLで定義したStoryboardを指定して実行します。
Blendを使うとタイムライン機能でエディットできるのがメリットですよね。EventTriggerを使うと条件ごとに分岐できないのがデメリット。
だからStoryboardはBlendで作っておいて、必要に応じてコードビハインドで分岐して実行するStoryboardを選ぶ、っている選択肢はありかな、と思います。
以下では記載を省略、コード部分のみを記載します。
[環境]
using System.Windows;
using System.Windows.Media.Animation;

namespace MoveRectangle_06
{
    /// <summary>
    /// MainWindow.xaml の相互作用ロジック
    /// </summary>
    public partial class MainWindow : Window
    {
        public MainWindow()
        {
            InitializeComponent();
        }

        private void btnToWidth100_Click(object sender, RoutedEventArgs e)
        {
            (this.Resources["ChangeTo100"] as Storyboard).Begin();
        }

        private void btnToWidth200_Click(object sender, RoutedEventArgs e)
        {
            (this.Resources["ChangeTo200"] as Storyboard).Begin();
        }
    }
}
[概要]
四角形の移動をアニメーションで実現します。
四角形の Margin プロパティを操作することで実現します。
以下で示すプログラムでは、XAMLでEventTriggerによる実装と、コードビハインドでの実装を、まとめて提示します。
[環境]
[MainWindow.xaml]
<Window x:Class="MoveRectangle_07.MainWindow"
        xmlns="http://schemas.microsoft.com/winfx/2006/xaml/presentation"
        xmlns:x="http://schemas.microsoft.com/winfx/2006/xaml"
        xmlns:d="http://schemas.microsoft.com/expression/blend/2008"
        xmlns:mc="http://schemas.openxmlformats.org/markup-compatibility/2006"
        xmlns:local="clr-namespace:MoveRectangle_07"
        mc:Ignorable="d"
        Title="MainWindow" Height="300" Width="400">
    <Window.Resources>
        <Storyboard x:Key="ToPos1">
            <ThicknessAnimationUsingKeyFrames Storyboard.TargetProperty="(FrameworkElement.Margin)" Storyboard.TargetName="myRect">
                <EasingThicknessKeyFrame KeyTime="0:0:1" Value="30,30,0,0">
                    <EasingThicknessKeyFrame.EasingFunction>
                        <PowerEase EasingMode="EaseInOut"/>
                    </EasingThicknessKeyFrame.EasingFunction>
                </EasingThicknessKeyFrame>
            </ThicknessAnimationUsingKeyFrames>
        </Storyboard>
        <Storyboard x:Key="ToPos2">
            <ThicknessAnimationUsingKeyFrames Storyboard.TargetProperty="(FrameworkElement.Margin)" Storyboard.TargetName="myRect">
                <EasingThicknessKeyFrame KeyTime="0:0:1" Value="200,70,0,0">
                    <EasingThicknessKeyFrame.EasingFunction>
                        <PowerEase EasingMode="EaseInOut"/>
                    </EasingThicknessKeyFrame.EasingFunction>
                </EasingThicknessKeyFrame>
            </ThicknessAnimationUsingKeyFrames>
        </Storyboard>
    </Window.Resources>
    <Window.Triggers>
        <EventTrigger RoutedEvent="ButtonBase.Click" SourceName="btnToPos1_xaml">
            <BeginStoryboard x:Name="ToPos1_BeginStoryboard" Storyboard="{StaticResource ToPos1}"/>
        </EventTrigger>
        <EventTrigger RoutedEvent="ButtonBase.Click" SourceName="btnToPos2_xaml">
            <BeginStoryboard x:Name="ToPos2_BeginStoryboard" Storyboard="{StaticResource ToPos2}"/>
        </EventTrigger>
    </Window.Triggers>
    <Grid>
        <Rectangle x:Name="myRect" Fill="#FFF4F4F5" HorizontalAlignment="Left" Height="100" Margin="30,30,0,0"
            Stroke="Black" VerticalAlignment="Top" Width="100" d:LayoutOverrides="VerticalAlignment"/>
        <Button x:Name="btnToPos1_xaml" Content="位置1へ移動する" Margin="30,179.858,0,0"
            VerticalAlignment="Top" HorizontalAlignment="Left" Width="130" Height="20"/>
        <Button x:Name="btnToPos2_xaml" Content="位置2へ移動する" Margin="198.662,179.858,0,0"
            VerticalAlignment="Top" HorizontalAlignment="Left" Width="130" Height="20"/>
        <Button x:Name="btnToPos1_code" Content="位置1へ移動する" Margin="30,235.818,0,0"
            VerticalAlignment="Top" HorizontalAlignment="Left" Width="130" Height="20" Click="btnToPos1_code_Click"/>
        <Button x:Name="btnToPos2_code" Content="位置2へ移動する" Margin="198.662,235.818,0,0"
            VerticalAlignment="Top" HorizontalAlignment="Left" Width="130" Height="20" Click="btnToPos2_code_Click"/>
        <Label Content="XAML" HorizontalAlignment="Left" Margin="30,0,0,89.142" VerticalAlignment="Bottom"/>
        <Label Content="Code behind" HorizontalAlignment="Left" Margin="30,0,0,33.182" VerticalAlignment="Bottom"/>

    </Grid>
</Window>
[MainWindow.xaml.cs]
using System;
using System.Windows;
using System.Windows.Media.Animation;
using System.Windows.Shapes;

namespace MoveRectangle_07
{
    /// <summary>
    /// MainWindow.xaml の相互作用ロジック
    /// </summary>
    public partial class MainWindow : Window
    {
        public MainWindow()
        {
            InitializeComponent();
        }

        private void btnToPos1_code_Click(object sender, RoutedEventArgs e)
        {
            var animation = new ThicknessAnimation
            {
                From = myRect.Margin,
                To = new Thickness(30, 30, 0, 0),
                Duration = TimeSpan.FromSeconds(1.0),
                EasingFunction = new PowerEase
                {
                    EasingMode = EasingMode.EaseInOut
                }
            };

            myRect.BeginAnimation(Rectangle.MarginProperty, animation);
        }

        private void btnToPos2_code_Click(object sender, RoutedEventArgs e)
        {
            var animation = new ThicknessAnimation
            {
                From = myRect.Margin,
                To = new Thickness(200, 70, 0, 0),
                Duration = TimeSpan.FromSeconds(1.0),
                EasingFunction = new PowerEase
                {
                    EasingMode = EasingMode.EaseInOut
                }
            };

            myRect.BeginAnimation(Rectangle.MarginProperty, animation);
        }
    }
}
[概要]
四角形の色を変えるアニメーションを実現します。
ColorAnimationUsingKeyFrames
を使って実現します。
以下で示すプログラムでは、XAMLでEventTriggerによる実装と、コードビハインドでの実装を、まとめて提示します。
[環境]

[MainWindow.xaml]
<Window x:Class="MoveRectangle_08.MainWindow"
        xmlns="http://schemas.microsoft.com/winfx/2006/xaml/presentation"
        xmlns:x="http://schemas.microsoft.com/winfx/2006/xaml"
        xmlns:d="http://schemas.microsoft.com/expression/blend/2008"
        xmlns:mc="http://schemas.openxmlformats.org/markup-compatibility/2006"
        xmlns:local="clr-namespace:MoveRectangle_08"
        mc:Ignorable="d"
        Title="MainWindow" Height="301" Width="400" ResizeMode="NoResize">
    <Window.Resources>
        <Storyboard x:Key="ToColor1">
            <ColorAnimationUsingKeyFrames Storyboard.TargetProperty="(Shape.Fill).(SolidColorBrush.Color)" Storyboard.TargetName="myRect">
                <EasingColorKeyFrame KeyTime="0:0:1" Value="#FFF0F0FF"/>
            </ColorAnimationUsingKeyFrames>
        </Storyboard>
        <Storyboard x:Key="ToColor2">
            <ColorAnimationUsingKeyFrames Storyboard.TargetProperty="(Shape.Fill).(SolidColorBrush.Color)" Storyboard.TargetName="myRect">
                <EasingColorKeyFrame KeyTime="0:0:1" Value="#FF8080FF"/>
            </ColorAnimationUsingKeyFrames>
        </Storyboard>
    </Window.Resources>
    <Window.Triggers>
        <EventTrigger RoutedEvent="ButtonBase.Click" SourceName="btnToColor1_xaml">
            <BeginStoryboard x:Name="ToColor1_BeginStoryboard" Storyboard="{StaticResource ToColor1}"/>
        </EventTrigger>
        <EventTrigger RoutedEvent="ButtonBase.Click" SourceName="btnToColor2_xaml">
            <BeginStoryboard x:Name="ToColor2_BeginStoryboard" Storyboard="{StaticResource ToColor2}"/>
        </EventTrigger>
    </Window.Triggers>
    <Grid>
        <Rectangle x:Name="myRect" Fill="#FFF4F4F5" HorizontalAlignment="Left" Height="100" Margin="30,30,0,0" Stroke="Black" VerticalAlignment="Top" Width="100" d:LayoutOverrides="VerticalAlignment"/>
        <Button x:Name="btnToColor1_xaml" Content="色1 へ変更" Margin="30,175.162,0,0" VerticalAlignment="Top" HorizontalAlignment="Left" Width="130" Height="20"/>
        <Button x:Name="btnToColor2_xaml" Content="色2 へ変更" Margin="193.662,175.162,0,0" VerticalAlignment="Top" HorizontalAlignment="Left" Width="130" Height="20"/>
        <Label Content="XAML" HorizontalAlignment="Left" Margin="30,149.202,0,0" RenderTransformOrigin="0.404,-0.239" VerticalAlignment="Top"/>
        <Label Content="Code behind" HorizontalAlignment="Left" Margin="30,201.374,0,0" VerticalAlignment="Top"/>
        <Button x:Name="btnToColor1_code" Content="色1 へ変更" Margin="30,227.334,0,0" VerticalAlignment="Top" HorizontalAlignment="Left" Width="130" Height="20" Click="btnToColor1_code_Click"/>
        <Button x:Name="btnToColor2_code" Content="色2 へ変更" Margin="193.662,227.334,0,0" VerticalAlignment="Top" HorizontalAlignment="Left" Width="130" Height="20" Click="btnToColor2_code_Click"/>

    </Grid>
</Window>
[MainWindow.xaml.cs]
using System;
using System.Windows;
using System.Windows.Media;
using System.Windows.Media.Animation;

namespace MoveRectangle_08
{
    /// <summary>
    /// MainWindow.xaml の相互作用ロジック
    /// </summary>
    public partial class MainWindow : Window
    {
        public MainWindow()
        {
            InitializeComponent();
        }

        private void btnToColor1_code_Click(object sender, RoutedEventArgs e)
        {
            System.Diagnostics.Trace.WriteLine("[btnToColor1_code_Click]");

            var storyBoard = new Storyboard();

            // 参照元  https://docs.microsoft.com/ja-jp/dotnet/framework/wpf/graphics-multimedia/how-to-animate-color-by-using-key-frames
            var colorAnimation = new ColorAnimationUsingKeyFrames
            {
                Duration = TimeSpan.FromSeconds(1)
            };

            colorAnimation.KeyFrames.Add(
                new LinearColorKeyFrame(
                    Color.FromRgb(0xf0, 0xf0, 0xff),
                    KeyTime.FromTimeSpan(TimeSpan.FromSeconds(1))
                )
            );

            Storyboard.SetTargetProperty(colorAnimation, new PropertyPath("(Shape.Fill).(SolidColorBrush.Color)"));
            storyBoard.Children.Add(colorAnimation);

            myRect.BeginStoryboard(storyBoard);
        }

        private void btnToColor2_code_Click(object sender, RoutedEventArgs e)
        {
            System.Diagnostics.Trace.WriteLine("[btnToColor2_code_Click]");

            var storyBoard = new Storyboard();

            // 参照元  https://docs.microsoft.com/ja-jp/dotnet/framework/wpf/graphics-multimedia/how-to-animate-color-by-using-key-frames
            var colorAnimation = new ColorAnimationUsingKeyFrames
            {
                Duration = TimeSpan.FromSeconds(1)
            };

            colorAnimation.KeyFrames.Add(
                new LinearColorKeyFrame(
                    Color.FromRgb(0x80, 0x80, 0xff),
                    KeyTime.FromTimeSpan(TimeSpan.FromSeconds(1))
                )
            );

            Storyboard.SetTargetProperty(colorAnimation, new PropertyPath("(Shape.Fill).(SolidColorBrush.Color)"));
            storyBoard.Children.Add(colorAnimation);

            myRect.BeginStoryboard(storyBoard);
        }
    }
}
本ページの情報は、特記無い限り下記 MIT ライセンスで提供されます。
| 2022-11-10 | - | 「1-2. VS2019版」を追加 |
| 2022-11-05 | - | ページデザイン更新 |
| 2018-04-07 | - | 4~7章を追加 |
| 2018-03-11 | - | 「3. Rectangle の幅(Width)と高さ(Height)をアニメーションする - XAML版」 を追加 |
| 2018-02-24 | - | 新規作成 |