Formアプリの子画面としてWPFで作成した子ウィンドウを起動する方法について記載します。
Formアプリの子画面としてWPFで作成した子ウィンドウを起動する方法について記載します。
| コンパイラ : | Visual Studio 2013 | |
| OS : | Windows7 | |
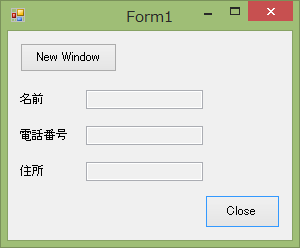
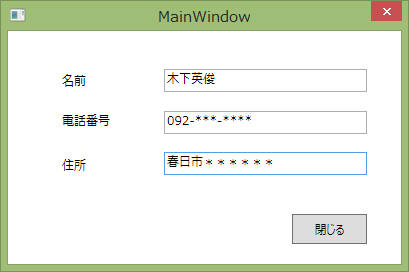
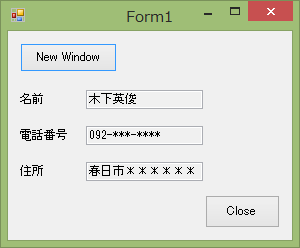
作成するアプリはこんな感じです。
まずは親側のFormで作成したアプリ。 「New Window」ボタンを押すことでWPFのウィンドウを起動するようにします。

「New Window」ボタンを押すことで下図のWPF子ウィンドウを開くようにします。

「閉じる」ボタンを押すことでForm側へ情報を反映するようにします。

次にコード部分を紹介します。
WPF側のコードです。VS2013で「WPFアプリケーション」を新規作成します。
["MainWindow.xaml"]
<Window x:Name="window" x:Class="WpfWindow.MainWindow"
        xmlns="http://schemas.microsoft.com/winfx/2006/xaml/presentation"
        xmlns:x="http://schemas.microsoft.com/winfx/2006/xaml"
        Title="MainWindow" Height="272" Width="409" ResizeMode="NoResize">
    <Grid>
        <Label Content="名前" HorizontalAlignment="Left" Margin="49,36,0,0" VerticalAlignment="Top" Height="25.24" Width="78"/>
        <Label Content="電話番号" HorizontalAlignment="Left" Margin="49,76,0,0" VerticalAlignment="Top" Height="25.24" Width="78"/>
        <Label Content="住所" HorizontalAlignment="Left" Margin="49,121,0,0" VerticalAlignment="Top" Width="78"/>
        <TextBox x:Name="txb_name" HorizontalAlignment="Left" Height="23" Margin="156,38.24,0,0" TextWrapping="Wrap" VerticalAlignment="Top" Width="203" Text="{Binding name, ElementName=window}"/>
        <TextBox x:Name="txb_telephone" HorizontalAlignment="Left" Height="23" Margin="156,80,0,0" TextWrapping="Wrap" VerticalAlignment="Top" Width="203" Text="{Binding phone, ElementName=window}"/>
        <TextBox x:Name="txb_address" HorizontalAlignment="Left" Height="23" Margin="156,121,0,0" TextWrapping="Wrap" VerticalAlignment="Top" Width="203" Text="{Binding address, ElementName=window}"/>
        <Button Content="閉じる" HorizontalAlignment="Left" Margin="284,183,0,0" VerticalAlignment="Top" Width="75" Height="30.24" Click="Button_Click"/>
    </Grid>
</Window>
["MainWindow.xaml.cs"]
using System;
using System.Collections.Generic;
using System.Linq;
using System.Text;
using System.Windows;
using System.Windows.Controls;
using System.Windows.Data;
using System.Windows.Documents;
using System.Windows.Input;
using System.Windows.Media;
using System.Windows.Media.Imaging;
using System.Windows.Navigation;
using System.Windows.Shapes;

namespace WpfWindow
{
    public class FinishEventArgs : EventArgs { }
    public delegate void FinishInputHandler(object sender, FinishEventArgs e);

    /// <summary>
    /// MainWindow.xaml の相互作用ロジック
    /// </summary>
    public partial class MainWindow : Window
    {
        public event FinishInputHandler FinishInputEvent;

        public string name
        {set;get;}

        public string phone
        { set; get; }

        public string address
        { set; get; }

        public MainWindow()
        {
            InitializeComponent();
        }

        private void Button_Click(object sender, System.Windows.RoutedEventArgs e)
        {
            // 入力完了をイベント通知
            if (FinishInputEvent != null)
            {
                FinishEventArgs finishEventArgs = new FinishEventArgs();

                FinishInputEvent(this, finishEventArgs);
            }

            // Windowを閉じる
            Close();
        }
    }
}
次にForm側のコードです。
Formアプリケーションを新規作成後、まずは参照に以下を追加します。WpfWindowは前述のWPFアプリケーションの名前空間です。
["Form1.cs"]
using System;
using System.Collections.Generic;
using System.ComponentModel;
using System.Data;
using System.Drawing;
using System.Linq;
using System.Text;
using System.Windows.Forms;

using System.Windows.Forms.Integration; // ElementHost
using WpfWindow;    // MainWindow


namespace FormSideAp
{
    public partial class Form1 : Form
    {
        private MainWindow window = null;

        public Form1()
        {
            InitializeComponent();
        }

        private void btnClose_Click(object sender, EventArgs e)
        {
            Close();
        }

        private void Form1_FormClosing(object sender, FormClosingEventArgs e)
        {
            if ( MessageBox.Show("終了してよろしいですか", "確認", MessageBoxButtons.YesNo, MessageBoxIcon.Question)== System.Windows.Forms.DialogResult.No)
            {
                // 終了しない
                e.Cancel = true;
            }
        }

        private void btnNewWindow_Show(object sender, EventArgs e)
        {
            window = new MainWindow();

            window.FinishInputEvent += FinishInputUpdater;

            // モーダルの場合は記載不要。
            // モードレスの場合、これを記載しないと子ウィンドウ側でASCIIを入力できない。
            ElementHost.EnableModelessKeyboardInterop(window);

#if false
            window.Show();
#else
            window.ShowDialog();
#endif
        }

        private void FinishInputUpdater(object sender, EventArgs e)
        {
            txb_name.Text = window.name;
            txb_telephone.Text = window.phone;
            txb_address.Text = window.address;
        }
    }
}
これで完成です。「ElementHost.EnableModelessKeyboardInterop()」の部分だけ注意して実装すれば特に大きな問題はなさそうです。
参考プログラム:ダウンロード
本ページの情報は、特記無い限り下記 MIT ライセンスで提供されます。
| 2023-05-25 | - | ページデザイン更新 |
| 2014-06-14 | - | 新規作成 |